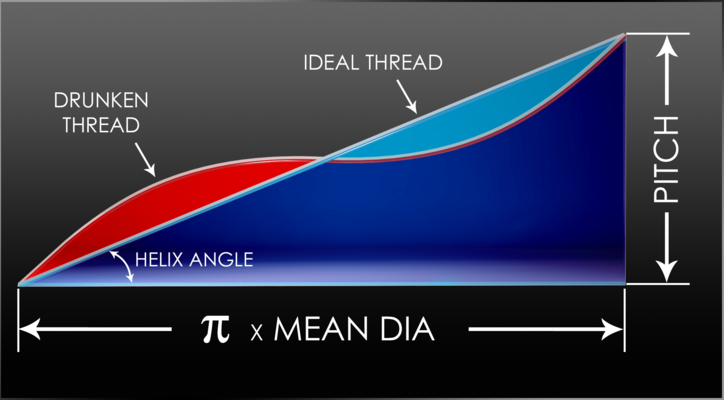
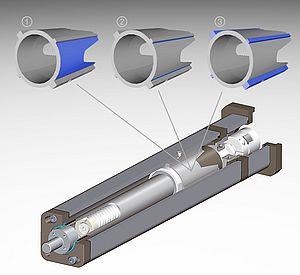
Thread drunkenness is defined as the erratic pitch error occurring within intervals of one pitch. This concept is hard to visualise unless it is represented by unwinding the thread from the screw cylinder.
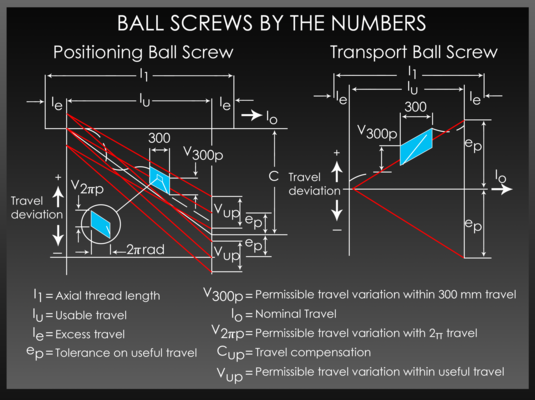
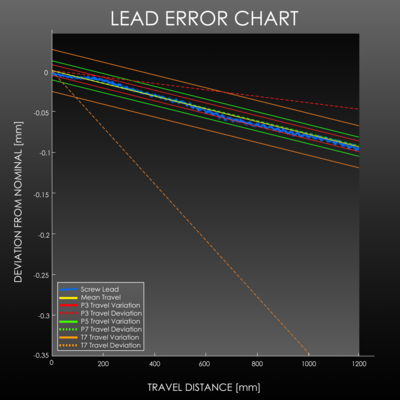
Guided by ISO, DIN & JIS industrial standards many design engineers broadly define lead accuracy of ball screws only in terms of error accumulated over 300 mm (V300) but often overlook the value of measuring or controlling lead accuracy per revolution (V2π). Often referred to as ball screw drunkenness because of the hard-to-predict wobble it introduces into ball screw operation, lead accuracy per revolution is emerging as a critical parameter in miniature screw applications where the overall travel length is less than 300 mm.
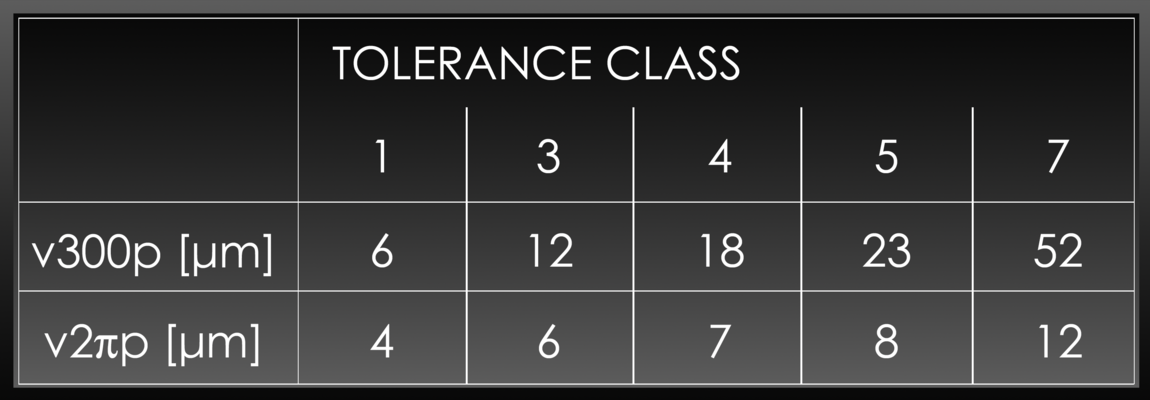
Many engineers improperly assume that the V2π error is insignificant in relation to the overall lead accuracy, V300, and therefore ignore the error when designing a ball screw into an application. As shown in Table 1, the lead error per revolution for a typical P5 screw can be 8µm or equal to 1/3 of the allowable lead error in 300 mm (23 µm).
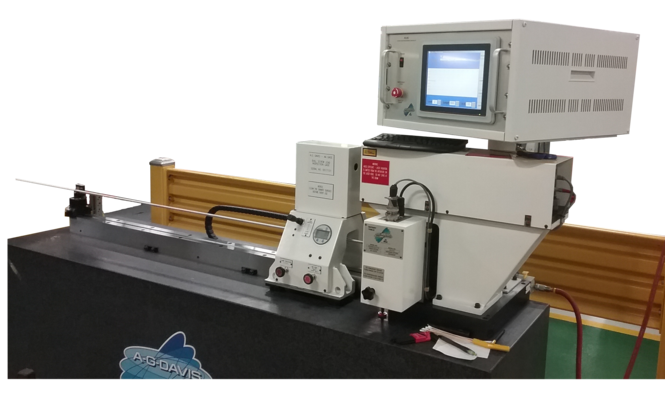
Revealing and quantifying this error can be challenging, even for the manufacturer, as expensive and specialised analysis equipment is necessary but not commonly available. Therefore, many manufacturers must rely on manual, individual measurements versus dynamic, continuous measurements that measure and record 100% positional accuracy throughout full travel. For example, a Ø12 mm ball screw with a 2 mm lead has 150 pitches over 300 mm and may require more than 600 measurements to accurately portray the screw characteristics.
Therefore, when some manufacturers receive requests for assemblies for precision applications with strokes of less than 300 mm, they typically manufacture a screw with the V300 accuracy graded in a longer screw and deliver the customer a short segment that falls within their requirement. As an example, if the customer specifies a P5 (23 µm/300 mm) screw with 125 mm of travel, the manufacturer might start with a two-meter length of P5 screw and cut off a 250 mm section to machine. That gives the customer what they asked for but may not address the actual performance parameters that impact the critical motion requirements of the application. The result could be costly rework and delays in the OEM’s ability to meet their customers’ requirements.
Dynamic measurement (continuous lead accuracy data collection of the screw under rotation) is also an important tool for quality review and continuous product improvement, which are foundational to the Thomson culture.
Consider, for example, the case of a medical fluid pump manufacturer who had specified P5 accuracy and 150 mm of travel length for a new medical device. Because they are not screw experts, they only specified a lead accuracy of 23 µm/300 mm in their specification document. Although the pump manufacturer had no way of independently measuring screw accuracy, they were able to measure fluid dispersion dynamically, correlate this data to the screw accuracy and ultimately reject standard screw product that met the original requested accuracy. Specifying accumulated error over 300 mm was ultimately determined to be irrelevant for this application, and a customised specification was necessary to achieve desired performance. By correlating the dynamic fluid dispersion data with the dynamic screw performance, Thomson was able to explicitly identify screw characteristics that negatively impacted pump performance. This data was then used to revise the screw specifications and eliminate undesired error from the system.
Ball screws in context
The solution to accounting for ball screw drunkenness, of course, is to specify product with an awareness of the full application context, and this requires a manufacturer with the expertise to match product performance to application-critical specifications. Thomson has the largest breadth of ball screw products available, decades of application experience, various manufacturing capabilities and specialised inspection equipment—all brought together to fully understand and solve the most complex requirements. ISO/DIN/JIS specifications are a good place to begin product understanding, but the process should not end there. Lead accuracy is only one part of the overall story and must be interpreted within the context of other parameters. In addition to the desired lead accuracy of the application and related drunkenness, the context includes end machining, journal runout, straightness and geometric tolerances of the overall system.
Although most of the discussion is typically focused on the screw performance in terms of positional accuracy, the corresponding ball nut further complicates the analysis. Because the nut is the interface between the screw and the load, the drunkenness effect can be filtered or amplified by the nut’s interaction with multiple pitches of the screw. Most ball nuts have 3-10 loaded turns of ball bearings and, therefore, are within contact with multiple threads on the screw simultaneously. Hence, it is vital to measure the accuracy using a single gauge ball to accurately map a screw.
Advanced manufacturers have experts who can work with customers to help them through the steps of determining the full context of their needs and subsequently selecting product to meet those needs. The challenge can be engineers ordering ball screws from catalogues based on an isolated understanding of the screw parameters. For applications requiring more than 300 mm of travel length, this may not be a problem, but it becomes increasingly critical when in context of today’s trend toward miniature products. Miniature ball screws, with 1, 2 or 3 mm leads in full stroke ranges of 100 or 200 mm are not uncommon, and specifying cumulative error over 300 mm is all but meaningless.
Factoring in production costs
Accurate, full context specifications can also impact the cost of production and the price. Thread rolling screws is a far less expensive production process than thread grinding, and the requirement of the V300 parameter is a deciding factor in selecting the manufacturing method. The improvement of modern thread rolling equipment can produce V300 values typical of P3 screws, but controlling drunkenness with the rolling process is much more complicated and typically requires achieving a lead accuracy one level better than specified (i.e. a P3 screw may be specified in place of a P5). Alternatively, customers can always choose the traditional thread grinding process to improve drunkenness, which can increase the price by 5-10 times over the rolled version.
Another solution for a precision application would entail specifying V300 accuracy for a short stroke application, buying a less expensive rolled product and then using software to reach the required precision. Although lead error may wobble throughout the stroke, this error is repeatable and can be mapped and corrected by software. Because the mapping process itself takes time and must be supported by rotary encoders, optical monitoring or other secondary feedback solutions, the total solution may be more expensive to implement. Software and hardware solutions can also be combined in high-precision applications to provide the most accurate systems.
Combating drunkenness
Managing ball screw drunkenness in miniature applications will require a concerted effort by end users, manufacturers and standards groups. End users must recognise that the stated catalogue specifications of the ball screw are only one factor and must draw on the resources of their suppliers to help them match the product that will meet their needs most cost effectively. The right supplier will provide the resources and encouragement to make it possible for their customers to understand and identify what they actually require in terms of specifications. Standard groups must recognise the fact that applications requiring miniature ball screws require a different set of accuracy grades and provide appropriate guidance.
Jeff Johnson, PE Global Product Line Manager – Screws, Thomson Industries, Inc.


